
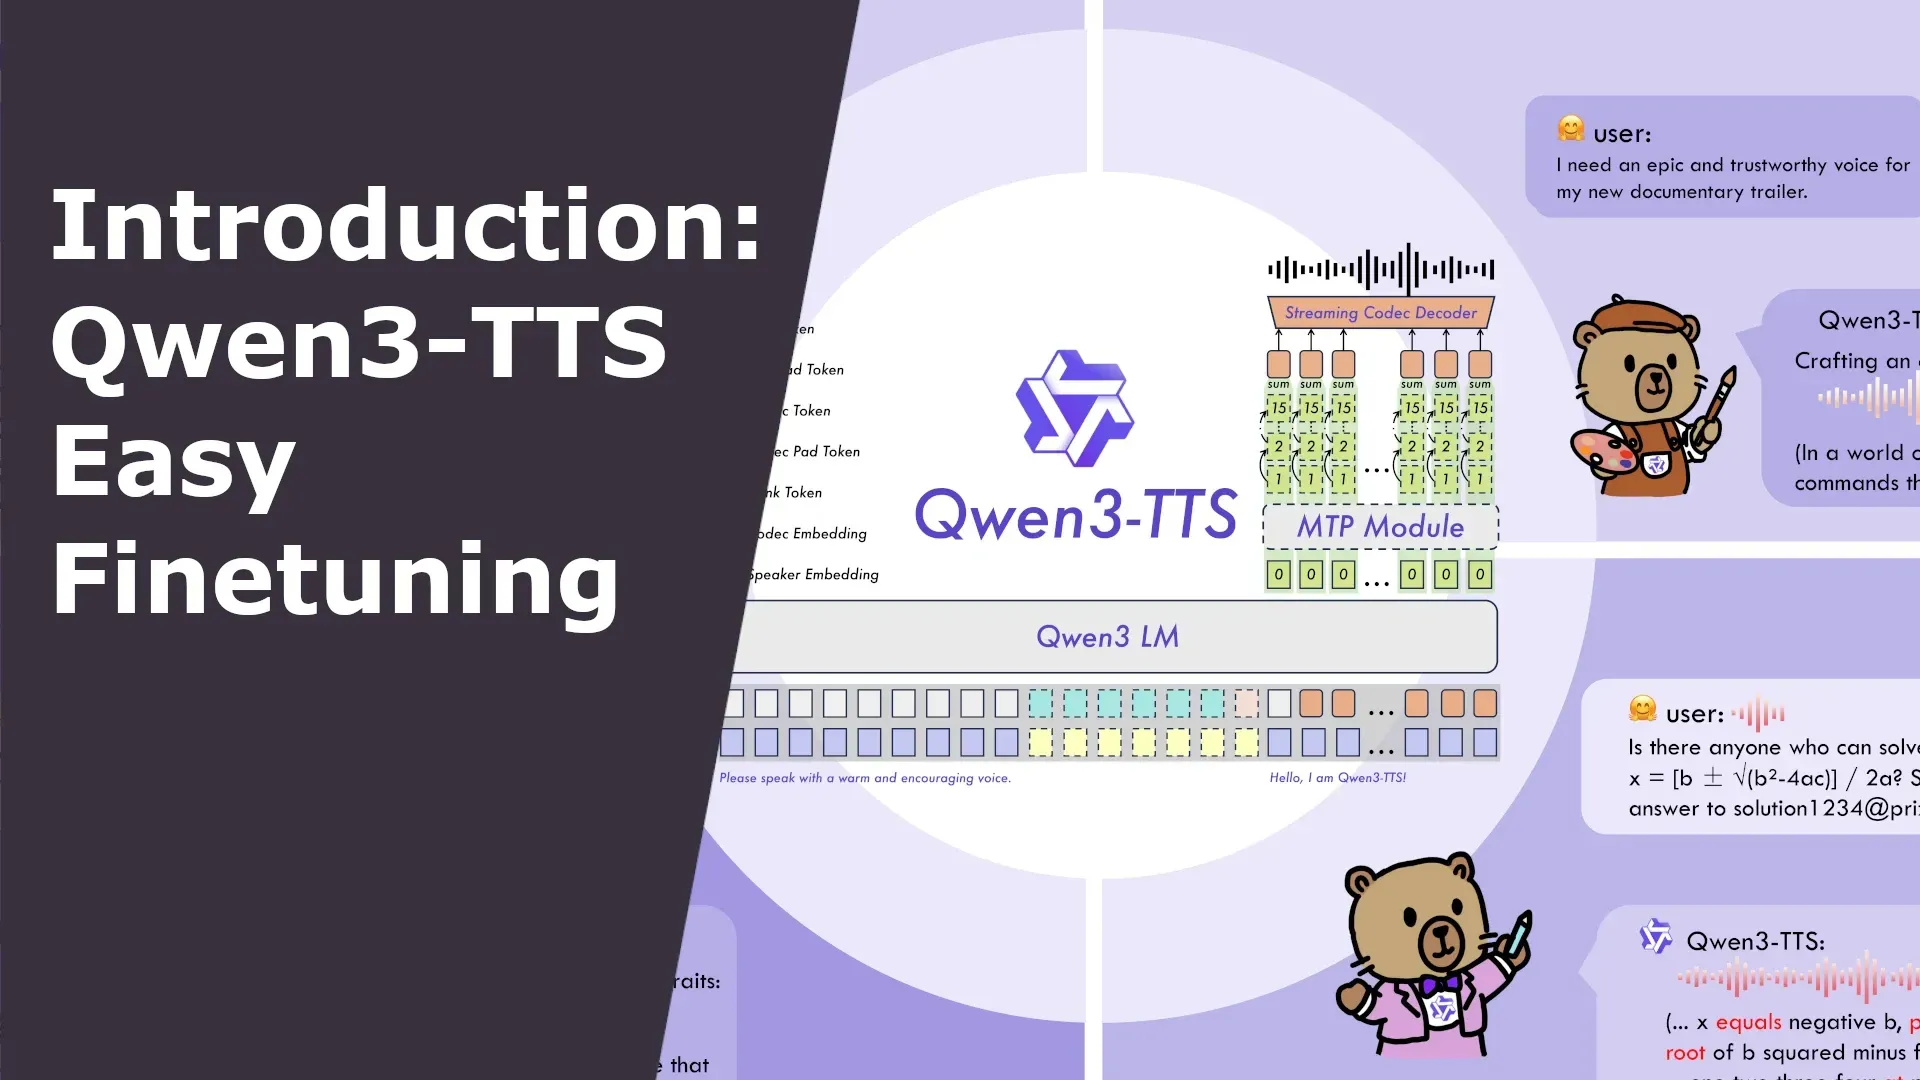
Want AI to narrate novels with your voice? Looking to create custom timbres for video characters?
This article will guide you step-by-step through using the Qwen3-TTS Easy Finetuning tool to build a stable, natural, and accent-free multilingual voice model.
Read this article in Chinese: Qwen3-TTS 微调完全指南:从零开始训练你自己的语音模型
Why You Need Fine-tuning, Not Just Zero-shot Cloning?
AI voice cloning has become incredibly popular recently. You might have heard that you can “clone anyone’s voice with just a few seconds of audio.” This technology is called Zero-shot TTS, and it’s indeed convenient and fast. But it has a critical flaw: poor stability. Generate the same sentence twice, and the timbre might sound distant or close; when speaking different sentences, the voice might even “drift” into sounding like another person.
Although Qwen3-TTS’s zero-shot cloning performs quite well and avoids many of the above issues, some shortcomings still exist, such as:
- Accents present when speaking cross-lingually
- Less natural intonation
- Insufficient emotional expression
If you’re just experimenting, zero-shot cloning might suffice. But if you aim to:
- Produce videos or podcasts long-term with a fixed voice;
- Maintain consistent intonation for a character across different scenes;
- Have a Chinese speaker’s model sound like a native when speaking English;
Then you need Fine-tuning.
Fine-tuning essentially allows the AI to deeply learn all the pronunciation details of the target speaker, ultimately resulting in a single-speaker model – it excels at imitating only this one voice but achieves extremely high stability, naturalness, and the ability to understand emotional and pace instructions in natural language (e.g., “speak in a sad tone,” “speed up”).
⚠️ Important Note: A fine-tuned model is no longer a “cloning model” but a fixed voice model. It cannot switch to another person on the fly like zero-shot cloning can. If you need multi-role dubbing, you can fine-tune one model per character and switch between them.
Good news! This project now leads the official release by pioneering support for multi-speaker fine-tuning simultaneously! You can customize voice models for multiple roles more efficiently in one go.
What is Qwen3-TTS Easy Finetuning?
This is an out-of-the-box toolkit I developed, based on the latest open-source Qwen3-TTS model from Alibaba’s Tongyi Lab. It saves you the hassle of coding and environment configuration, allowing you to complete the entire process from raw audio to a dedicated voice model through a graphical interface (WebUI) or simple commands.
- One-Click Operation: Automates the entire pipeline: audio segmentation, automatic transcription (ASR), data cleaning, encoding, and training.
- Modern WebUI: Built with Gradio, intuitive operation with real-time progress display.
- Built-in Optimized Configurations: Provides validated training parameters for both the 0.6B and 1.7B model sizes.
- Docker Support: Launch with one command, no need for manual dependency installation.
Preparation: What Do You Need?
- A computer with an NVIDIA GPU (Recommended VRAM ≥ 8GB; fine-tuning the 1.7B model requires ≥ 16GB. The author used a single 3080 10G for training).
- Clean recordings of the target speaker(s) (Recommended 10–30 minutes, WAV format, minimal background noise).
- Basic command-line skills (copy-paste is enough).
- (Optional) Familiarity with Docker, or using Python virtual environment directly.
Step 1: Installation and Startup
Method 1: Using Docker (Recommended, Fastest, Most Reliable)
# Clone the repository
git clone https://github.com/mozi1924/Qwen3-TTS-EasyFinetuning.git
cd Qwen3-TTS-EasyFinetuning

# Start the container
docker compose up -d
The first start will automatically download the image (approx. 10GB), please wait a moment. Seeing a green Started indicates the program has launched successfully. However, the WebUI needs about 30 seconds to warm up. Once ready, open your browser and visit http://localhost:7860. If accessing from another machine on your local network, replace localhost with the IP address of the deployment machine.
Method 2: Using Python Virtual Environment (Suitable for Developers)
# Clone the repository
git clone https://github.com/mozi1924/Qwen3-TTS-EasyFinetuning.git
cd Qwen3-TTS-EasyFinetuning

# Create a virtual environment
python -m venv venv
source venv/bin/activate  # Linux/Mac
# venv\Scripts\activate   # Windows

# Install dependencies
pip install -r requirements.txt
pip install flash-attn==2.8.3 --no-build-isolation  # Optional, speeds up training

# Start the WebUI
python src/webui.py
After starting, also visit http://localhost:7860.
Step 2: Prepare Your Data
This is a crucial step. Place your raw audio files (.wav format) into the raw-dataset directory under the project folder, following this structure:
raw-dataset
├─ speaker_1            # Folder for speaker 1
│   ├── 0001.wav        # Audio files, ideally one sentence per file
│   ├── 0002.wav
│   ├── 0003.wav
│   └── ref.wav         # ⭐ Mandatory reference audio
├─ speaker_2            # Folder for speaker 2 (for multi-speaker training)
│   ├── 0001.wav
│   ├── 0002.wav
│   ├── 0003.wav
│   └── ref.wav         # ⭐ Each speaker has their own reference audio
.....
Important Notes about ref.wav:
ref.wavis mandatory. It will be embedded in the model as a stable reference for timbre, tone, and speed, ensuring consistent inference results.- Choose a segment you deem highest quality from that speaker’s training data.
- Recommended duration is 3-10 seconds, minimum not less than 3 seconds, maximum not exceeding 10 seconds.
Step 3: Fine-tuning with the WebUI (Detailed Walkthrough)
The WebUI is divided into three main tabs. Let’s go through them step-by-step.
📁 Tab 1: Data Preparation
1.1 Refresh Paths and Run Step 1: Audio Segmentation
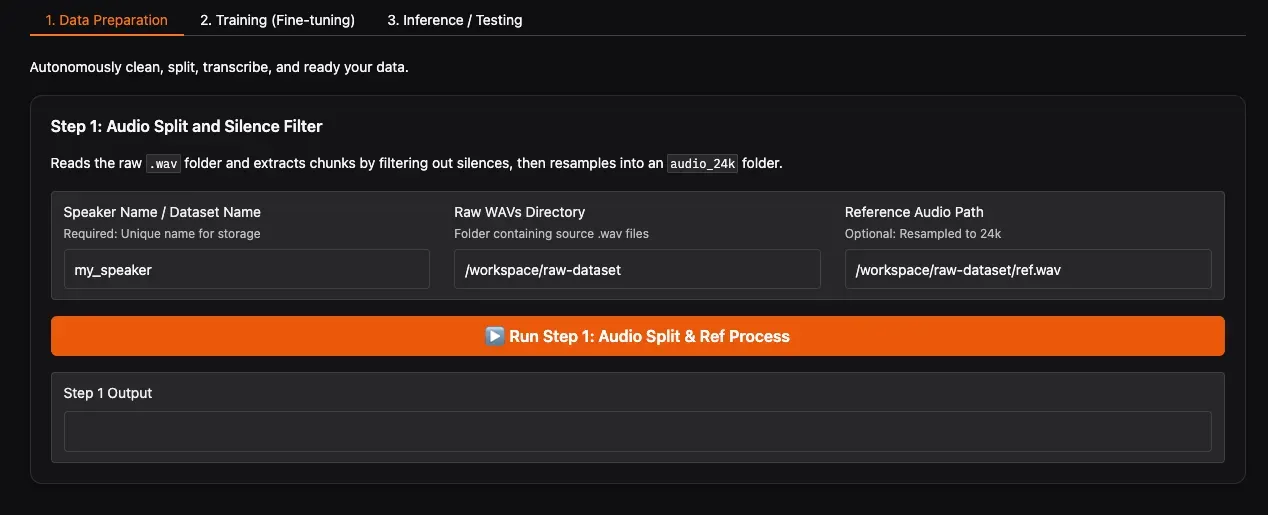
In the WebUI:
- Click the Refresh Paths button. The system will automatically detect folders and
ref.wavfiles underraw-dataset. - Confirm that your dataset folder (e.g.,
speaker_1) appears in the Raw WAVs Directory dropdown. - Reference Audio Path will auto-fill with the path to
ref.wavin the corresponding folder; no manual modification needed. - Click Run Step 1.
This step is CPU-intensive. It’s recommended to close other background software to avoid freezing. The program analyzes the audio, automatically removes silence, splits long audio into short segments, and unifies the sample rate to 24kHz. After completion, you’ll find the processed audio clips in final-dataset/speaker_1/audio_24k/.
1.2 Run Step 2: ASR Transcription & Secondary Cleaning
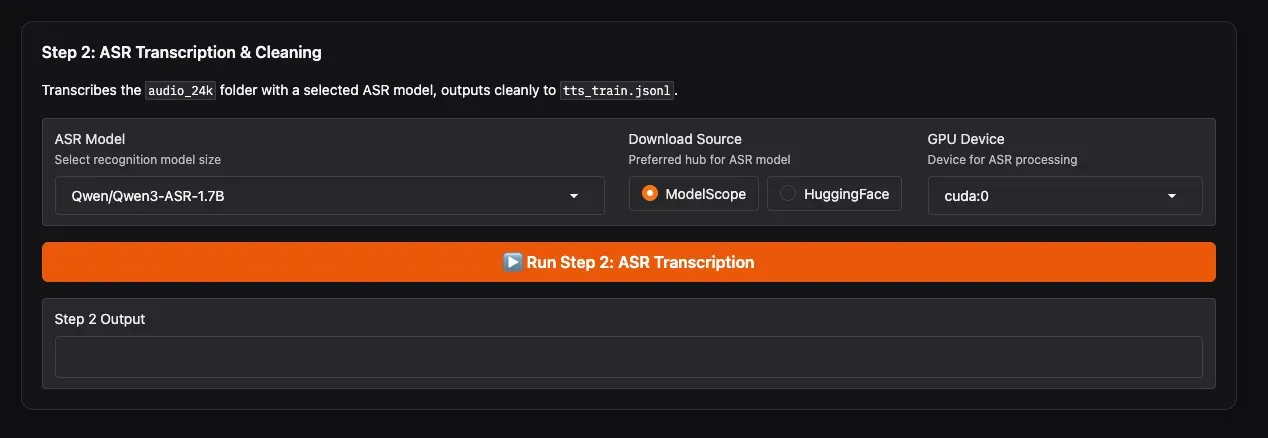
This step uses an ASR model to automatically recognize the content of each audio clip, generate text labels, and perform secondary cleaning.
- ASR Model: Highly recommended to select
Qwen/Qwen3-ASR-1.7Bfor the most accurate recognition. - Download Source: If you are in Mainland China, choose ModelScope for the fastest download speed; users overseas can select HuggingFace.
- GPU Device: Select the GPU for ASR (e.g.,
cuda:0). - Click Run Step 2.
Wait for the progress bar to complete. You will obtain final-dataset/speaker_1/tts_train.jsonl, where each line is {"audio": "path", "text": "recognized text"}. The WebUI will notify you upon completion.
🏋️ Tab 2: Training
2.1 Create a New Experiment and Select Data (Step 0)
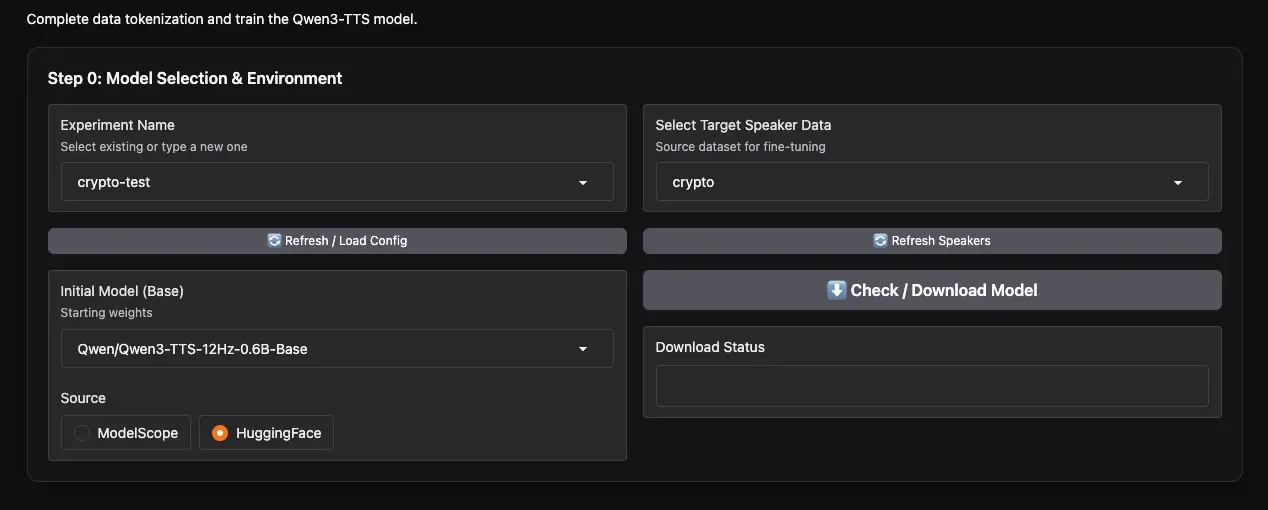
- Experiment Name: Enter a name, e.g.,
my_first_voice, then click Create New Experiment. - Select Target Speaker Data: In the dropdown, select the speaker(s) you want to fine-tune. Thanks to the new feature, you can multi-select here to enable simultaneous multi-speaker training!
- Initial Model: Choose the base model. The video author recommends the 0.6B model, finding it sufficient. You can also choose
1.7Bif needed. - Download Source: Again, choose ModelScope or HuggingFace based on your network environment.
- Click Check / Download Model to download the base model beforehand.
2.2 Run Step 3: Data Tokenization
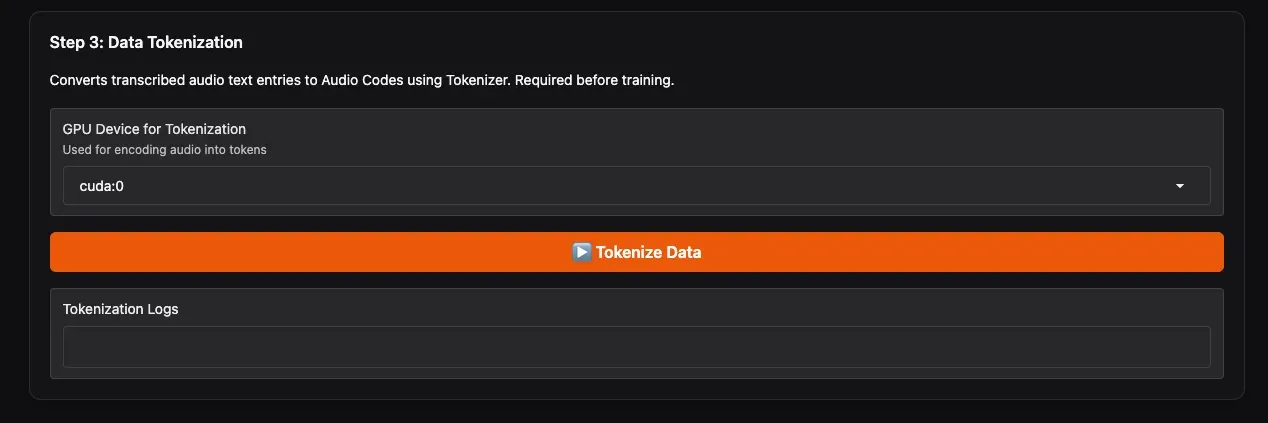
- GPU Device for Tokenization: Select the GPU for this step.
- Click Tokenize Data.
This step merges data from your selected speakers and uses Qwen3-TTS’s specialized tokenizer to convert audio into discrete codes, outputting tts_train_with_codes.jsonl – the final file used for training. A progress bar will indicate completion.
2.3 Set Training Parameters and Start Training (Step 4: Final Training)
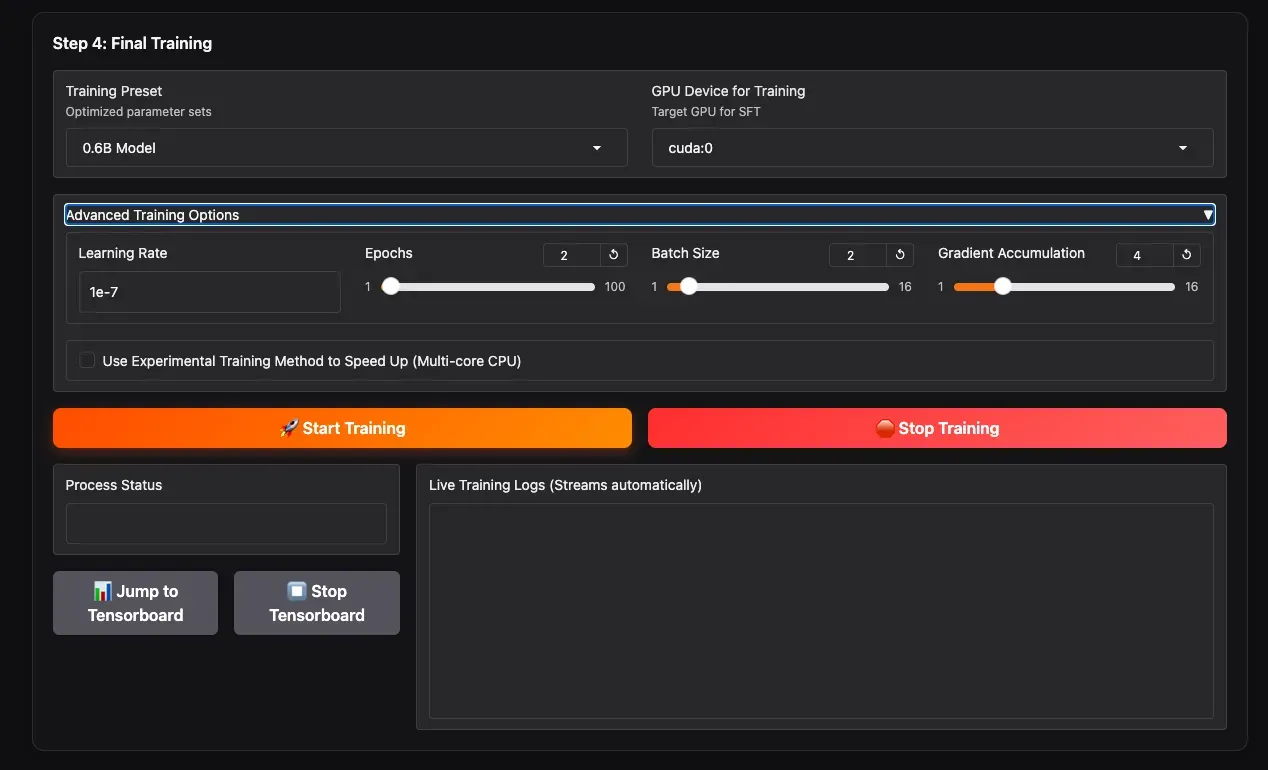
- Training Preset: Select the training preset corresponding to your chosen model size (0.6B / 1.7B). These are community-verified, relatively conservative parameters.
- Advanced Training Options: Expand this section to manually adjust parameters like
batch_size,learning_rate, etc., if you wish to customize. - GPU Device for Training: Select the GPU for training.
- Click the yellow Start Training button to begin.
You can monitor real-time training information on the progress bar below, such as epoch, step, and loss values. For more detailed statistics, click Jump to Tensorboard.
Training duration depends on data volume and model size. Typically, for 10–30 minutes of audio, training a 0.6B model for 2–3 epochs on a 10GB GPU might take about 1–2 hours.
After training, model checkpoints are saved in the output/my_first_voice/ directory.
🎧 Tab 3: Inference Testing
3.1 Load Checkpoint and Generate Speech
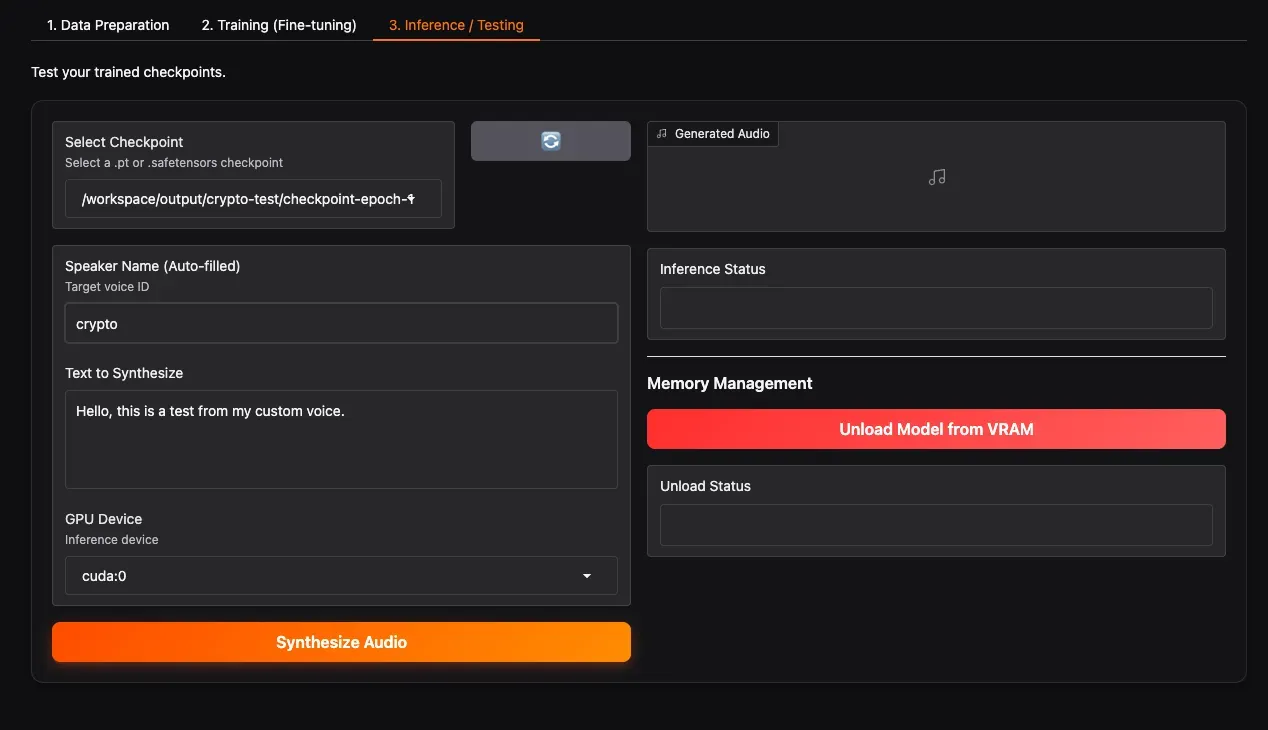
- Select Checkpoint: Click the refresh button, then select your newly trained checkpoint folder from the dropdown (e.g.,
checkpoint-epoch-2). - Select Speaker: Choose the speaker you want to test.
- Text to Synthesize: Enter the text you want to test. It can be in Chinese, English, or mixed.
- GPU Device: Select the GPU for inference.
- Click Synthesize Audio. Wait a moment, and the generated speech will play below. If satisfied with the result, congratulations! Your dedicated voice model is ready!
Feel free to explore the working directory and WebUI interface for more advanced features and options.
Advanced Tips: How to Get Better Results?
- Data Quality > Data Quantity: 10 minutes of clean, emotionally rich recordings far outweigh 1 hour of noisy recordings.
- Avoid Background Music: ASR transcription can be disturbed by music, leading to incorrect text.
- Increase Epochs Appropriately: If the voice doesn’t sound like the target, try increasing to 5-10 epochs, but watch out for overfitting (sounding robotic/rigid).
- Adjust Learning Rate: The preset learning rates are usually suitable. If the loss oscillates, you can try lowering it slightly.
Frequently Asked Questions
Q: I don’t have a GPU. Can I train with a CPU?
A: Yes, but it will be extremely slow (potentially days for one model). It’s recommended to use cloud GPU instances like AutoDL, Colab, etc.
Q: What if I run out of VRAM during training?
A: Reduce batch_size, increase gradient_accumulation_steps, or switch to the 0.6B model.
Q: I only have 1 minute of audio. Can I fine-tune?
A: You can, but the results might be unstable. It’s recommended to gather at least 5 minutes or more.
Q: Can I still zero-shot clone others after fine-tuning?
A: No. A fine-tuned model is dedicated to the speaker(s) you trained it on. For multiple roles, use this tool’s multi-speaker fine-tuning feature or fine-tune separate models.
Q: The generated speech has static/background noise?
A: Check the quality of your original audio; ensure there’s no background noise in the training data. You can use tools like UVR5 for noise reduction before Step 1.
Conclusion
With the guidance in this article, you should now master how to use Qwen3-TTS Easy Finetuning to train your own voice model. This tool encapsulates the complex AI training pipeline into simple steps, allowing everyone to possess their own AI voice.
If you encounter any issues during operation, feel free to submit an Issue on the GitHub repository. Sharing your fine-tuned results is also welcome! Share your experiences with the community and progress together.
Project Repository: https://github.com/mozi1924/Qwen3-TTS-EasyFinetuning
